
Summer Wheel Throwing
- Laura Zielinski
- Oct 20, 2019
- 3 min read

Updated: Oct 21, 2019
10/19/19
I spent a lot of hours watching a metal wheel spin clockwise with a hunk of clay on it. Did I learn anything? I hope so.


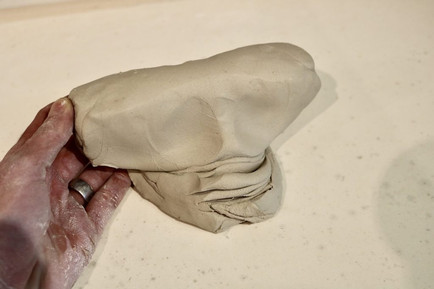
Above we see some misbehaving monke––I mean clay. I wedged this clay using the monkey face wedging technique, but the clay had a mind of its own. I suppose makes some sense since we had to give it a "face" to fix it up for effective clay use (demostrated on the right––photo credit to Julia Ben-Asher). Maybe its not a convincing monkey face to some, but those air bubbles were so persuasive that I knew my wedging had not worked.
Wedging releases the air from clay so that it can be molded to have a stable structure, dried properly without cracks, and then fired in a kiln without a possible explosion. This is particularly important to master when wheel throwing which is why I set aside two days just to wedge this summer. I discovered that I prefer the spiral technique. But, if all else fails on a bad day, the cut and slap method will release both air bubbles and frustration so I highly recommend it.
I began my rediscovery of wheel throwing on June 3rd so that I would be prepared for Ceramics II at Wilkes University. This is my journey over five months.


So what did I learn? A simple equation.
Air bubbles + wheel throwing ≠ trash clay piece
Okay, that was kind of a joke, but really what can I take away from this?
1) Always wedge clay before throwing
2) Actually throw your clay down on the wheel so that it sticks and does not become dislodged (#).
3) Wet your whole hand before centering. Both of them. This creates a frictionless surface so that the clay moves smoothly in your hands rather than getting caught on the dry areas. With areas of the hand left dry, the clay is more likely to rub off onto or be pushed more in these areas of contact and it will cause uneven thickness in the vessel walls.
4) Center your clay. If you can't, work on it until you can because it makes the pulling step easier.
5) Clean the clay body of water and slip before pulling––se a metal rib to complete this task. This cleaning will provide a uniform surface instead of one that is soaked at the bottom (easy pulling) and drier at the top (more difficult pulling). The top of the piece is harder to pull because the water leaves it faster due to a combination of gravity and centrifugal force. You also have to loosen up your pull at the top so as to not create too thin of a lip.
6) Give the bottom of the centered clay a "one-knuckle sandwich". You can push with your knuckle on the base of the piece to bring up some of the clay. This moved clay is what you pull up.
7) When pulling, notice the angle of your hands and fingers. Try all different angles until you get one that is stable and efficient for throwing. Some positions will allow for a faster pull or one that moves more clay upward.
8) Cut your clay piece. I had to learn that almost everything I wheel threw was trash and I had to dissect it down the middle to get a diagnosis of how poorly or how well I had thrown it. Attachment to a piece of work cannot occur until you have put the work in to understand the clay. You would not attach yourself to a person who you do not know too well, why do that to clay? Learn it, spend time with it, and then you can love it.
9) I still prefer hand building over wheel throwing better because I understand how clay moves and joins at a lower plasticity and a lower moisture level. Hence, I built a salt shaker with the chemical structure of Piperine. More on this when it is complete, but for now just try to imagine what it looks like :)
Comments